**NOTE: I saved this as a draft and forgot to post it...
The past year has been a wonderful one! We have written short stories, posted weird videos, posted funny videos, posted some videos with a point, some without. We have realized that people all over the world are (hopefully) enjoying our weirdness (if not, why do you keep coming back, any of you?). We have probably gotten a few more viewers from Seattle. I don't know. I wasn't there. But we were together all year long, even though we were apart (keep reading! It isn't gonna be sappy!... Okay, maybe a little, but read on!).
I really do entirely curse the day,
When those UHaul trucks took my RK away.
(^not promoting or de-promoting. Just making a metaphor^)
Thanks for sticking with us through all the weirdness; and let me tell ya, there was a LOT of it.
In the coming year, we would continue to make funny and cool videos, and write cool stuff, and do whatever it is RK does, but, as we all know, that is the Apocalypse.
Love,
The Art Drawer
Random + Writing,
CB
Keep it Nurby!
~RK

Showing posts with label achievements. Show all posts
Showing posts with label achievements. Show all posts
Monday, January 16, 2012


Friday, January 13, 2012
Jan 08
January 8 was our 6 month anniversary! Just wanted to mention that. It is the 13 right now, but I just noticed it so yay! Let's celebrate really fast right now! Yay! Streamers! Cake! Yay! Oh no, it has peanuts in it, I can't have it! Poo! Oh well, I guess I'll just have a chocolate. Yum! Okay. Done celebrating. :D
Random + Writing,
CB
Random + Writing,
CB
Sunday, January 8, 2012
Callous in Blunderland (A One-Man Show) (Family, Comedy)
A girl (CB) named Callous ventures into the mysterious world of Blunderland, meeting all sorts of new friends and foes. When she makes a very big mistake, she wonders if she will ever sort it out.
Written, produced, and directed by CB. A one-man show!
Thank you for watching!
This production brought to you by:
The Art Drawer, CB, GB
And Viewers Like YOU!
Callous...CB
Door...CB
White Rabbit...CB
Centshire Pig...CB
Mad Hotter...CB
Queen of Hearts...CB
Tinkerbell...CB
Director...CB
Poker Player...CB
The Art Drawer...Itself
The Art Drawer Voice...CB
Directed by...CB
Filmed by...CB
First waking scene filmed by...GB
Views of Poker Player filmed by...GB
Story by...CB
Written by...CB
I forgot to mention:
Costumes and Props provided by...CB
Thank you for watching! I hope you enjoyed. Please, don't hesitate to give feedback!
Random + Writing,
CB
P.S. I apologize for being so late! It was supposed to be filmed and edited many, many months ago, around the time that I wrote it, but I didn't. At least it is here now!
Written, produced, and directed by CB. A one-man show!
Thank you for watching!
This production brought to you by:
The Art Drawer, CB, GB
And Viewers Like YOU!
Callous...CB
Door...CB
White Rabbit...CB
Centshire Pig...CB
Mad Hotter...CB
Queen of Hearts...CB
Tinkerbell...CB
Director...CB
Poker Player...CB
The Art Drawer...Itself
The Art Drawer Voice...CB
Directed by...CB
Filmed by...CB
First waking scene filmed by...GB
Views of Poker Player filmed by...GB
Story by...CB
Written by...CB
I forgot to mention:
Costumes and Props provided by...CB
Thank you for watching! I hope you enjoyed. Please, don't hesitate to give feedback!
Random + Writing,
CB
P.S. I apologize for being so late! It was supposed to be filmed and edited many, many months ago, around the time that I wrote it, but I didn't. At least it is here now!
Saturday, January 7, 2012
Coming Soon: Callous in Blunderland *UPDATE!*
Okay, I am finally going to make Callous in Blunderland. Three more days to do it. Let's go!
Friday, January 6, 2012
The Diary of Neville Longbottom
Check out this new blog: www.nevillesdiary.blogspot.com
It is a fanfic of Neville Longbottom from Harry Potter. He is really depressed! Poor Nevvy!
Written by Yours Truly
Based on and inspired by the Harry Potter novels by J.K.Rowling and movies, property of Warner Bros. Entertainment Inc.
Neville Longbottom or other characters, settings, names, and objects are completely and absolutely property of Warner Bros. Entertainment Inc., and J.K.Rowling. COPYRIGHTED NAMES ARE NOT PROPERTY OF THE ART DRAWER, OR CB. Some story lines are kind of my property, but not copyrighted. Reproduction is just discouraged. Thanks! :)
It is a fanfic of Neville Longbottom from Harry Potter. He is really depressed! Poor Nevvy!
Written by Yours Truly
Based on and inspired by the Harry Potter novels by J.K.Rowling and movies, property of Warner Bros. Entertainment Inc.
Neville Longbottom or other characters, settings, names, and objects are completely and absolutely property of Warner Bros. Entertainment Inc., and J.K.Rowling. COPYRIGHTED NAMES ARE NOT PROPERTY OF THE ART DRAWER, OR CB. Some story lines are kind of my property, but not copyrighted. Reproduction is just discouraged. Thanks! :)
Saturday, December 24, 2011
Coming Soon: Solar Penguin Dance Party
This one won't live up to your expectations. I just did this one for fun. Coming soon, there will be a dance party video that will ROCK YOUR OUT-OF-THIS-WORLD'S SOCKS OFF! Woot!
Look for it soon on the one and only ART DRAWER!
Random + Writing,
CB
Look for it soon on the one and only ART DRAWER!
Random + Writing,
CB
Rain and Thunder (Artistic Video)
Rain and Thunder is Our Plunder
Time Duration: 1:01 minutes
Music: Rain and thunder is Our Plunder Soundtrack (Garageband Music by CB. Rights Protected.)
This is a video. An actual video that really complements my vision. It worked out just as I had hoped it would, which is unusual for my videos. This is the first one I am really happy with (though I quite enjoyed my editing technique on my One Man Show). I hope you enjoy.
I had this vision of a rainy day, and music, and all of the artistic perspectives, so I composed some music on Garageband. I mapped out these points in the music where it didn't fit right, and I marked it, calling it a "Crow." I divided each Crow Section and wrote in a shot sequence for each shot on a Legal Pad (Legal Pads are very good for video notebooks). I then either found the shots in iPhoto (our photo-holding application on our Mac), or went out and shot them right then and there. This video is the final outcome of my artistic vision, and I do hope you enjoyed. Please give me feedback, whether good, or bad. I am currently studying videography, and I would like to know what I could do better.
Tuesday, December 20, 2011
Logo Opinion Poll
Thank you very much to our visitors who have voted. I think some of them may be the Art Drawer's personal friends, like moonembrace, or maybe they are all from our friends across the globe!
The results are in. Here are the standings:
Yes - Very much 0
Yes - Yes 0
Yes - Okay 0
Neutral 0
No - Not really 1
No - No 5
No - I hate it 0
Wow... There is an overwhelming sense of NO there... Hmm... Well, we will crunch the numbers and see if the logo is affecting us any... If so, BYE BYE, BOW TIE! If not, DEAL WITH IT, YOU NINNIES! Hahaha! :D Thanks, everyone, for participating in our poll.
Random + Writing,
CB
The results are in. Here are the standings:
Yes - Very much 0
Yes - Yes 0
Yes - Okay 0
Neutral 0
No - Not really 1
No - No 5
No - I hate it 0
Wow... There is an overwhelming sense of NO there... Hmm... Well, we will crunch the numbers and see if the logo is affecting us any... If so, BYE BYE, BOW TIE! If not, DEAL WITH IT, YOU NINNIES! Hahaha! :D Thanks, everyone, for participating in our poll.
Random + Writing,
CB
Holiday Poll
Do you celebrate Christmas, Hanukkah, or anything else during the holidays? Are you looking forward to the holiday time of the year, no matter what you celebrate? Go ahead and scroll... Keep scrolling... And... There! In the left hand side! See it? Under the calendar. Yeah, that. Click one of the choices and SUBMIT! You have 5 days left!
Monday, December 19, 2011
New Logo Poll
Please submit your opinion about the new logo in the poll to the immediate right of this post. Thanks! It will help us LOTS! :D The logo IS for your enjoyment, anyway.
Random + Writing,
CB
Random + Writing,
CB
Sunday, December 11, 2011
Saturday, December 10, 2011
The Art Drawer Logo: Conclusion
The votes are in! The new logo for the Art Drawer IS.....


Da, dada DAA!! The new Art Drawer logo is the bow-tie, drawn by Yours Truly! Thank you for your submissions, which were all very beautiful! Wonderful job everyone, and thank you for participating in one of the most important events in all of Art Drawer History!
Random + Writing, for RK,
CB
Sew Your Own Cut-Open Avocado!
MATERIALS
- Dark green felt
- Light LIGHT green felt
- Bright brown felt (pit. This means that this color shouldn't be very dark, or too light. More bright beige than anything)
- Thread
- Needle
- Stuffing
HOW-TO
Set up -
- Cut out an avocado-shaped shape out of the light green felt.
- Place it on the sheet of dark green. With a good, black pen, trace around the light green, but a bit larger than the shape. MAKE SURE YOU TRACE FARTHER AWAY FROM THE LIGHT GREEN SHAOE TOWARDS THE BOTTOM (THE FAT PART)
- Cut out the shape you have marked with the pen.
Skin -
- Fold the dark green over. Slide long scissors into the crease, and cut it in half, more or less.
- Trim off a tiny bit from the straight side, curving a bit of the top, and a bit of the bottom.
- Place them on top of each other, and sew the straight(-ish) edges together.
- Flip it 'inside-out.' This means the seam is not sticking out from it and it is not flat; the seam is more on the inside and the rest is curving around it.
Inside -
- Place the light green shape even with the top of the dark green. Sew them together, shifting them so that the edges of the dark green are sewn to the edges of the light green, even though they are of different sizes. DO NOT SEW IT ALL THE WAY!!! Stop about 2 - 3 inches from finishing, but don't tie-off yet.
- Don't turn it inside out, this time. Leave the stitch on the outside, not doubled over on the inside. Stuff it (NOT TOO MUCH!!!) and finish sewing it up.
Pit -
- Cut a circle out of brown felt. Hold it up to the light green of the inside of the avocado. If it looks about the right size, put it back on the sheet of felt and cut a circle about 7/16 of an inch larger (not in square inches; in size going away from the center)
- (See step 4 before starting step 2) Line up the small circle with the larger circle's top and sew them together, shifting it around, just like the avocado itself. DON'T SEW IT ALL THE WAY UP!!! Stop about 1 inch from finishing, but don't tie-off, yet.
- Stuff it really big. The smaller circle should stay rather flat.
- The larger circle will be too large to sew onto the smaller one, because its circumference (distance around it) is so large. Double it over a tiny bit in a few places once you have stuffed it so that it looks better. (FROM STEP TWO: READ STARTING HERE) If you wish, you can do the pit similar to how you have done the avocado (cutting the larger into two pieces and rounding, then sewing it together so that its circumference is closer to the smallest).
- Place it towards the bottom of the light green of the avocado (the small circle should be touching the avocado). (This might be kind of hard...) Sew the pit to the avocado using the seams you made when making the pit. Try and have it centered, so that it is not closer to one side than the other. Tie off when finished.
- Make any finishing touches, like snipping off strings, cleaning p messy stitches, etc., etc., etc.
Voila!!
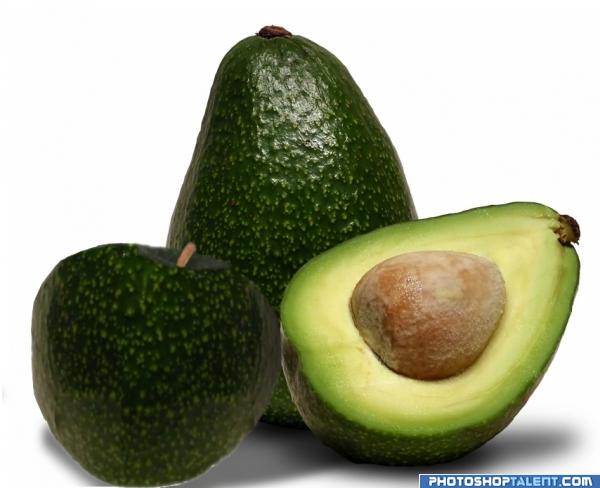 |
| Avocado! These show the color of the skin, a pretty good version of the color of the inside, and the placement of the pit. (As you can see from the lower right corner of the photo, the Art Drawer does not own this picture) |
Random + Writing,
CB
2000!!!
HAPPY ANNIVERSARY, ART DRAWER! We have shared our art for the 2000th time! We have finally reached 2000 views. Thank you to all of our friends, close and far!!!
Random + Writing,
CB
Random + Writing,
CB
Friday, December 9, 2011
Sew Your Very Own APPLE!
MATERIALS
- Three long-ish ovals of red felt
- A reasonably sized square of green felt (leaf (x 2))
- A brown rectangle (stem)
- Stuffing
- Sewing needles
- Pins
- Scissors
- Thread
HOW-TO
- Starting at the top, sew together two of the red ovals, ending at the bottom. Tie a knot, but if you have enough thread left, don't cut it off. If you need to rethread, now is the time to do it.
- Sew the last piece on to one side of the two already attached ovals.
- Now, since you have reached the top, sew downward, partly attaching the last bit that is open. Leave about two to three inches open, and turn the whole thing inside-out, so the seams are on the inside.
- Stuff stuff stuff! When there is no room left, continue to stuff stuff stuff!
- Sew up the side, and cinch it at the bottom.
- Roll the brown rectangle up once, just so one of the sides is hidden inside. Sew it along the side of the outside, and the layer underneath. Finally, attach it to the top of the apple.
- Cut out two leaf shapes of the same size and shape and sew them together. Then sew that leaf to the base of the stem. Make any necessary stitches to make it stay in the position you want
- Make any minor adjustments.
Voila!
 |
| Apple! (The Art Drawer does not own this picture) |
Random + Writing,
CB
Sew an Eggplant Out of Felt
I am allergic to eggplant, but a felt one can't hurt!
MATERIALS
MATERIALS
- Dark purple kidney bean-shaped felt
- Light green/dark green felt
- Scissors
- STUFFING STUFFING STUFFING!!
HOW-TO
- Starting at the top (the skinny part), sew one side of two of the ovals together, ending at the bottom (the fat part).
- Sew the third oval to one side of the eggplant, this time starting at the bottom. Sew up to the top (where you started sewing at the beginning.
- Sew a little bit on the side that is unattached to the other sides. Flip the entire thing inside-out, so the seams are pretty much hidden.
- Stuff a little, then sew some more. Stuff, sew, stuff, sew. Continue this until it is full of stuffing. Then close the opening.
- Cut three small green shapes, kind of looking like Justin Bieber's hair. (lol) Place them on the top part of the eggplant (the skinny part). Sew them on. If any parts need any extra securing, go ahead and sew them on. If you want, you can just sew all the edges on. Whichever you think looks best!
If you want you, you can add a stem make of rolled-up green felt and just sew it onto the middle of the green part.
Make any finishing touches, and voila! Perfecto!
Random + Writing,
CB
Random + Writing,
CB
Thursday, December 8, 2011
How to Sew a Corn Cob
Do you like or hate corn? You can't just tolerate it. You either love or hate it. So how do you feel?
Hate Love (circle one)
Well, whichever you would have circled, I guarantee you that you will LOVE this corn cob!!
MATERIALS
HOW-TO
Cob -
Hate Love (circle one)
Well, whichever you would have circled, I guarantee you that you will LOVE this corn cob!!
MATERIALS
- Three yellow pointy ovals (3 in x 2 1/2 in)
- Two green pointy ovals (5 in x 2 1/2 in)
- Thread
- Sewing Needles
- A dark Sharpie™marker or other permanent marker
- Scissors
- Stuffing
HOW-TO
Cob -
- Pin together and sew TWO of the ovals together on ONLY ONE side, but DON'T TIE OFF WHEN YOU GET TO THE BOTTOM!!!!!!!!!
- Pin the third oval to either ONE of the already used ovals. Sew the thread across the tip and sew the new oval to one side of either one of the already used ovals. Tie a knot, and if you have a bit left, you can continue as far as you can up the side. You probably will have to make a new threaded needle, though.
- When you sew a bit, put in some stuffing. Continue sewing and add a little as you sew each inch more. Finally, you will get to the very top!
Now you have finished the cob. Time to start the husk!
Husk -
- Sew about 3 in. of the ovals together.
- Once you have done this, be sure that the ovals are together, not flipped around so that to side you have sewn is flipped around. Sew the seam of the husk to a seam on the corn cob, lining it up so that the bottom of the husk reaches the bottom of the cob.
- Now it should look like the corn has a dorsal fin like a fish. Flip the husk technically 'inside-out.' Now the husk should be slightly wrapping around the corn, not coming straight off the back.
- Rethread your needle if you don't have a lot left. Stretch (not STRETCH stretch) the husk around to the front-ish side of the cob. Sew the husk to the cob. Sew exactly 2 in. from the bottom on both sides.
- Look at your cob. If the husk looks strange up above the cob, then cut it down to 4 in. and snip off some of the curve on the 'inside' of the husk until you are happy with it.
Cob Retouches (OPTIONAL) -
- With the marker, draw a grid on the cob to look like the kernels.
DONE!!
 |
| Corn cob! This is pretty much what you will be making! THIS PICTURE NOT PROPERTY OF THE ART DRAWER!! WE TAKE NO CLAIM ON THIS PHOTO, AND TAKE NO CREDIT WHATSOEVER. |
French Braid Your Hair
Well,as you probably know, it is pretty hard to do on yourself, but not impossible, because I just did it while my hair was wet. I tried to a couple days ago, and my hair was dry, and it was IMPOSSIBLE. But, since my hair was wet, the strands didn't get tangled with the loose hair.
Here is how you do it.
**NOTE: If you are a lefty, you will do this the opposite of the directions (left or right). Because I am a righty, I will do this the right-handed way.
MATERIALS
Here is how you do it.
**NOTE: If you are a lefty, you will do this the opposite of the directions (left or right). Because I am a righty, I will do this the right-handed way.
MATERIALS
- Long, wet hair
- A hair band (either size depending on how much hair you are dealing with.
INSTRUCTIONS
- Brush your hair so that you are sure there are no tangles.
- (Sort of) OPTIONAL: If dealing with short bangs, just brush straight back. If this is not the way you wish to appear, just separate the bangs, an brush straight back BEHIND them.
- Run your thumbs along the upper corners of your head, gathering hair all the way until your thumbs meet. Brush away any hair that got collected from UNDER your thumbs. This is considered loose hair.
- Separate the hair you are holding into three even strands.
- Braid, but stop before it stars to become its own braid and come off the head.
- Take a strand of hair from about two inches under the first place you got hair from. (Gather all the hair within two inches)
- Bring the hair you are holding and put it in the same strand as the strand you are about to cross over to the middle, as you would in a regular braid.
- Now do the same thing as steps 6 and 7, except from the left side.
- Continue this until you have gathered almost all of the hair. If there is hair hanging in the exact middle of the nape of the neck, you don't have to divide it in two. Just gather all of that and add it to the other strand.
- If you would like, continue braiding (a regular braid) all the way down until you run out of hair. If you don't want to do that, just tie it off with your hair band wherever you want!
Knowing how to French Braid is an important skill in creative hairstyling. You should practice on yourself and your friends and family! Because, as you already know, perfect practice makes best!
If you need any clarifications, I DON'T CARE! GO HANDLE IT YOURSELF!! Haha! Just kidding! If you need any clarifications, just drop me a comment below. Don't email me, because others might have the same question, and I bet they would like to get the answer at the same time. :)
Good luck!
Random + Writing + HAIR,
CB
Wednesday, December 7, 2011
Banana Plush *UPDATE*
Mine turned out kinds strange... I would like to add that on the last step of making the cream banana part, you need to sew closed the bottom. The author forgot to add that. Also, you don't need to have cotton in the bottom of the peal.
Anyway, ti turned our really cute! I didn't do the face, but it is still pretty cool. I was searching online, seeing where I could buy a plush banana, cause I'm just that awesome, and then I found these directions! I just love that website it is on. Really helpful for arts and crafts. Once again, the site is www.cutoutandkeep.net. Have fun crafting!!!
:)
Random + Writing,
CB
Anyway, ti turned our really cute! I didn't do the face, but it is still pretty cool. I was searching online, seeing where I could buy a plush banana, cause I'm just that awesome, and then I found these directions! I just love that website it is on. Really helpful for arts and crafts. Once again, the site is www.cutoutandkeep.net. Have fun crafting!!!
:)
Random + Writing,
CB
Wednesday, November 23, 2011
Newscast Taping
I was in a taping of a newscast yesterday. It wasn't like, CNN or something. It was an assignment to write a transcript for a Greek/Roman "newscast." We all did other projects, but one of my friends, who also writes scripts, wrote a transcript and we all participated (there are six 6th graders in my class. All the rest are fifthies. d(; ) I played Persephone, goddess of gardens and flowers. Sarmasi played Demeter, goddess of agriculture, who is also Persephone's mother. Bigab played Athena, goddess of wisdom and battle strategy. Macreon played Larry Zuza (a play on the host of the CNN Student News show, Carl Azuz). Scarlett Telsarct played Dionysus, god of wine (the actress was a girl). And Rasim was our technician (all of their names were scrambled for security. Those aren't ACTUALLY their names).
Anyway, we all played our parts pretty well, and we recorded it in our school's newsroom. It was a lot if fun! If I can get access to it, I will post it here.
Random + Writing,
CB
Anyway, we all played our parts pretty well, and we recorded it in our school's newsroom. It was a lot if fun! If I can get access to it, I will post it here.
Random + Writing,
CB
Subscribe to:
Posts (Atom)