Thank you very much to our visitors who have voted. I think some of them may be the Art Drawer's personal friends, like moonembrace, or maybe they are all from our friends across the globe!
The results are in. Here are the standings:
Yes - Very much 0
Yes - Yes 0
Yes - Okay 0
Neutral 0
No - Not really 1
No - No 5
No - I hate it 0
Wow... There is an overwhelming sense of NO there... Hmm... Well, we will crunch the numbers and see if the logo is affecting us any... If so, BYE BYE, BOW TIE! If not, DEAL WITH IT, YOU NINNIES! Hahaha! :D Thanks, everyone, for participating in our poll.
Random + Writing,
CB

Tuesday, December 20, 2011
Holiday Poll
Do you celebrate Christmas, Hanukkah, or anything else during the holidays? Are you looking forward to the holiday time of the year, no matter what you celebrate? Go ahead and scroll... Keep scrolling... And... There! In the left hand side! See it? Under the calendar. Yeah, that. Click one of the choices and SUBMIT! You have 5 days left!
Monday, December 19, 2011
New Logo Poll
Please submit your opinion about the new logo in the poll to the immediate right of this post. Thanks! It will help us LOTS! :D The logo IS for your enjoyment, anyway.
Random + Writing,
CB
Random + Writing,
CB
Thursday, December 15, 2011
Sixth Grade Christmas
In my class, the 6 people in our grade have decorated the pod for Christmas (the pod it the in between room between classrooms. Sometimes called the office, too). We have Christmas lights around the whiteboard, tinsel streamers around the door, bells, stockings, Christmas trees, and ornaments. But the most fun of all is the Secret Santa! We are getting gifts for each other. I got a present already. Also, since one of the kids in my class might not be here on Friday (our Opening Day), he showed his to his recipient today, but the recipient can't have it till tomorrow. Mine is already wrapped. In the morning, I need you to email me, reminding me to bring the Secret Santa gift (itsbumpybackhere@gmail.com). The funny thing is, we haven't told our teacher, and we didn't have permission to decorate, but she saw it and didn't object... I wonder how she will react on Friday when we give and receive? O.O Laul!*
Random + Writing + Christmas,
CB
P.S. Sorry if you don't celebrate Christmas! That is perfectly fine! No reason it wouldn't be! If you don't celebrate Christmas, in the comments, tell us a little bit about what you do during the holidays, or what you celebrate instead. We would love to learn about your culture! :D
*Instead of thinking L-O-L, I actually think 'laul,' as in 'Paul.' I also think 'burb' instead of 'B-R-B.' Haha!
Sunday, December 11, 2011
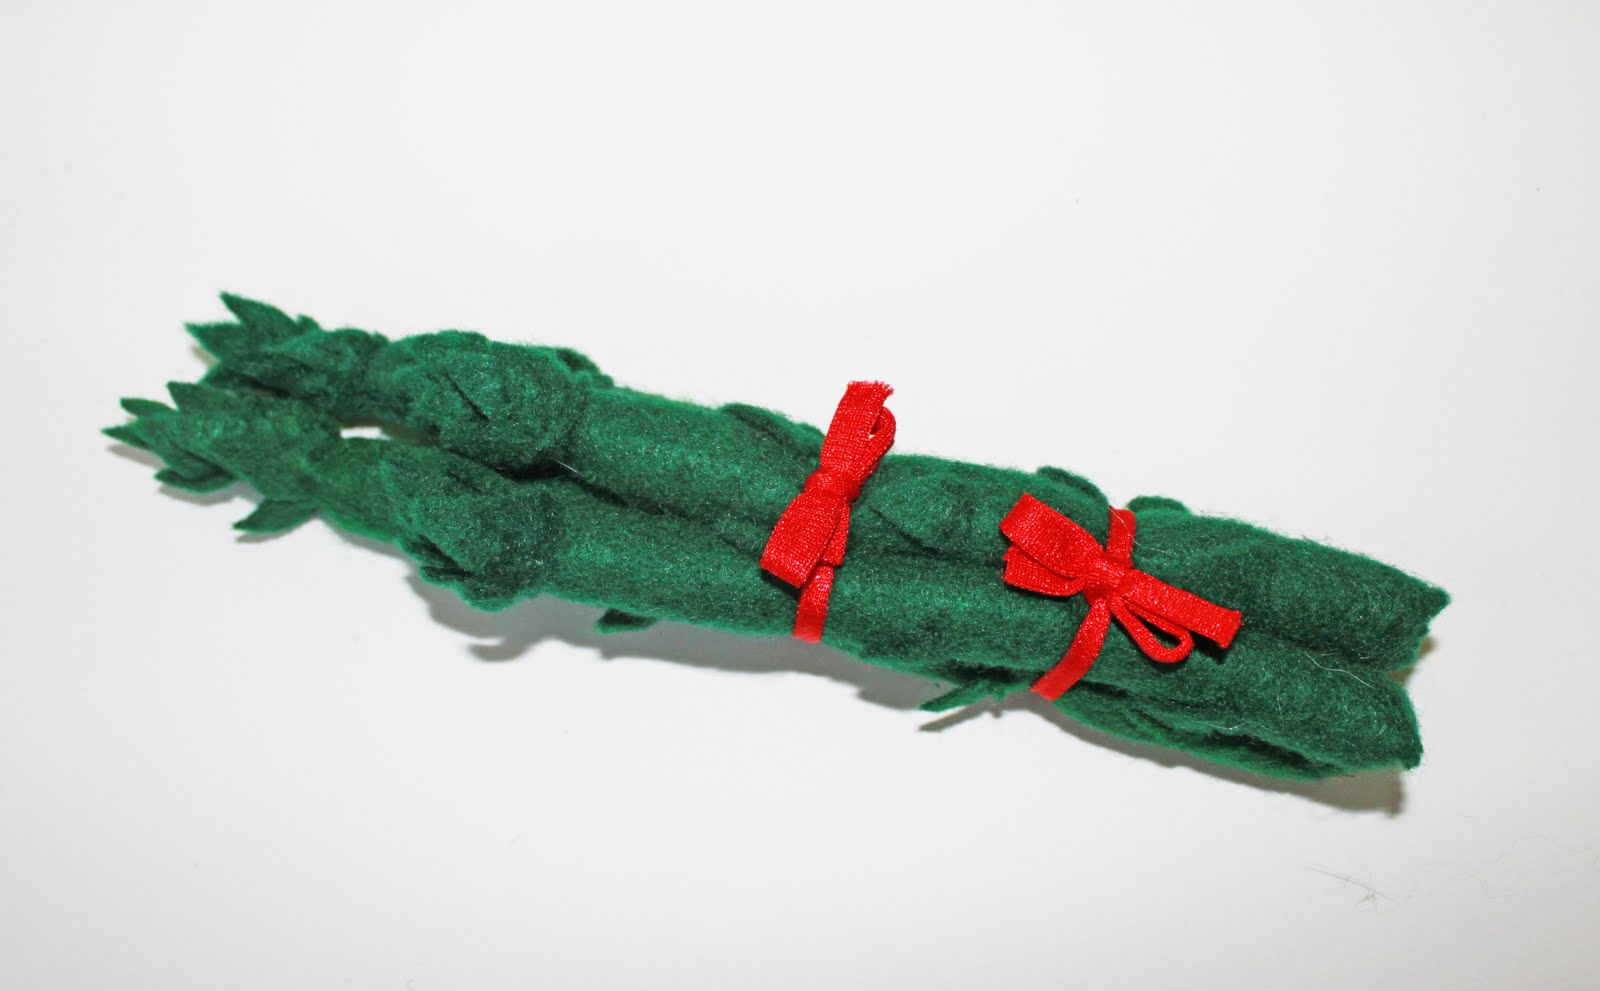
How to Make Asparagus Out of Felt - by http://whilewearingheels.blogspot.com
I had glanced at this to see a pattern and a few pointers, and I did the rest on my own. This is different than I had done it, but I believe this seamstress to have a bit more experience, especially since she has a blog all about making fake food (and those radishes at the top look really good!!)
Here si the link to the page with the asparagus: http://whilewearingheels.blogspot.com/2011/09/i-heart-fake-food-felt-asparagus.html
Here is the tutorial by WhileWearingHeels.blogspot.com:
I heart fake food: Felt Asparagus

This pattern can be completed without using a sewing machine.
Supplies needed:
Dark Green Felt
Dark Green Thread
Fiberfill
Needle
Scissors
Optional: Red Ribbon or Thread
Using this pattern, which can also be found here.

Cut out all the pieces of your asparagus.

Fold the body of the asparagus in half, length-wise, overlapping the sides about a 1/4 of an inch. Hand sew it closed, running the length of the asparagus.

Continue to sew the length of the asparagus closed.

Stop sewing when you get about a 1/2 inch from the top of the asparagus.

Remove your needle and thread from the top of your asparagus and sew the bottom of the asparagus closed.

Fill the body of the asparagus with fiberfill. Do not fill past the 1/2 inch unsewn opening on the top.

Cut the top of the asparagus, the 1/2 inch you left open, giving the top the appearance of having a layer of leaves.

Taking one section of the top leaves...

Roll it up.

Do a few stitches at the bottom of the rolled up leaves. This will help maintain the shape you just created by rolling the leaves.

Add the next layer of leaves. Begin to roll the other layer, arranging it so this layer of leaves is slightly lower than the first layer of leaves.

Again, add a few stitches so that both layers of leaves are now sewn together.

Insert the 2 layers of leaves, you just sewed together, into the top of the asparagus.

Sew the top of the asparagus closed. Start sewing, at the base of the leaves you cut from the body of the asparagus, making sure you are also going through the additional layers, attaching them as well.


Set the individual leaves on the body of your asparagus to determine placement.

You can either sew the leaves onto the body of the asparagus or you can glue them on. I attached mine by sewing.

And there you have it...

Asparagus is purchased in a bundle so you might want to make a few more. I like to bundle mine together with red ribbon.
Sew a Strawberry Out of Felt
MATERIALS
- Three small red felt triangles
- A green star-like shape, sort of like a sea-star with thin legs
- Needle
- Thread
- Stuffing
HOW-TO
**Note: Do not cinch it at the top until it says, even though it might seem strange.
- Place two of the triangles on top of each other and sew starting from the point. End at the corner of the bottom and tie off.
- Place the corner of the bottom of the third triangle on the needle and sew one side of the third triangle to the triangle closest to the corner you started at.
- Sew a little bit of the side that is loose, and turn it inside out.
- Stuf it really hard. The stuffing might spill out the top, but that is okay. Just be sure that the strawberry can fit the stuffing.
- Rethread the needle (or just make a new knot) and begin (at the flat part where the opening is) so that the knot is on the INSIDE of the berry. Cinch it closed, really tight, and it will look about the shape of a strawberry. Tie off once you have made a surgical knot (instead of going through the loop once, you go through twice).
- Make a new knot and string it through the middle of the green star. Place it on the strawberry so that the knot is not seen. Sew it to the berry, using only the center of the star.
- Make any minor adjustments.
Voila!
 |
| Strawberry! (the Art Drawer does not own this picture) Results of these instructions may vary from the picture shown above. |
Random + Writing,
CB
Saturday, December 10, 2011
The Art Drawer Logo: Conclusion
The votes are in! The new logo for the Art Drawer IS.....


Da, dada DAA!! The new Art Drawer logo is the bow-tie, drawn by Yours Truly! Thank you for your submissions, which were all very beautiful! Wonderful job everyone, and thank you for participating in one of the most important events in all of Art Drawer History!
Random + Writing, for RK,
CB
Sew Your Own Cut-Open Avocado!
MATERIALS
- Dark green felt
- Light LIGHT green felt
- Bright brown felt (pit. This means that this color shouldn't be very dark, or too light. More bright beige than anything)
- Thread
- Needle
- Stuffing
HOW-TO
Set up -
- Cut out an avocado-shaped shape out of the light green felt.
- Place it on the sheet of dark green. With a good, black pen, trace around the light green, but a bit larger than the shape. MAKE SURE YOU TRACE FARTHER AWAY FROM THE LIGHT GREEN SHAOE TOWARDS THE BOTTOM (THE FAT PART)
- Cut out the shape you have marked with the pen.
Skin -
- Fold the dark green over. Slide long scissors into the crease, and cut it in half, more or less.
- Trim off a tiny bit from the straight side, curving a bit of the top, and a bit of the bottom.
- Place them on top of each other, and sew the straight(-ish) edges together.
- Flip it 'inside-out.' This means the seam is not sticking out from it and it is not flat; the seam is more on the inside and the rest is curving around it.
Inside -
- Place the light green shape even with the top of the dark green. Sew them together, shifting them so that the edges of the dark green are sewn to the edges of the light green, even though they are of different sizes. DO NOT SEW IT ALL THE WAY!!! Stop about 2 - 3 inches from finishing, but don't tie-off yet.
- Don't turn it inside out, this time. Leave the stitch on the outside, not doubled over on the inside. Stuff it (NOT TOO MUCH!!!) and finish sewing it up.
Pit -
- Cut a circle out of brown felt. Hold it up to the light green of the inside of the avocado. If it looks about the right size, put it back on the sheet of felt and cut a circle about 7/16 of an inch larger (not in square inches; in size going away from the center)
- (See step 4 before starting step 2) Line up the small circle with the larger circle's top and sew them together, shifting it around, just like the avocado itself. DON'T SEW IT ALL THE WAY UP!!! Stop about 1 inch from finishing, but don't tie-off, yet.
- Stuff it really big. The smaller circle should stay rather flat.
- The larger circle will be too large to sew onto the smaller one, because its circumference (distance around it) is so large. Double it over a tiny bit in a few places once you have stuffed it so that it looks better. (FROM STEP TWO: READ STARTING HERE) If you wish, you can do the pit similar to how you have done the avocado (cutting the larger into two pieces and rounding, then sewing it together so that its circumference is closer to the smallest).
- Place it towards the bottom of the light green of the avocado (the small circle should be touching the avocado). (This might be kind of hard...) Sew the pit to the avocado using the seams you made when making the pit. Try and have it centered, so that it is not closer to one side than the other. Tie off when finished.
- Make any finishing touches, like snipping off strings, cleaning p messy stitches, etc., etc., etc.
Voila!!
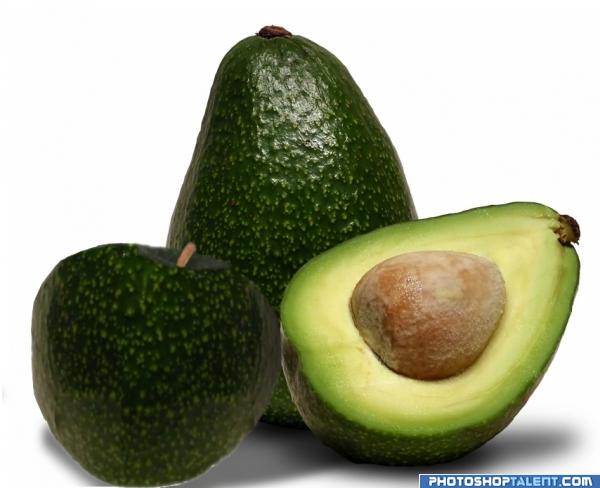 |
| Avocado! These show the color of the skin, a pretty good version of the color of the inside, and the placement of the pit. (As you can see from the lower right corner of the photo, the Art Drawer does not own this picture) |
Random + Writing,
CB
2000!!!
HAPPY ANNIVERSARY, ART DRAWER! We have shared our art for the 2000th time! We have finally reached 2000 views. Thank you to all of our friends, close and far!!!
Random + Writing,
CB
Random + Writing,
CB
Subscribe to:
Posts (Atom)