January 8 was our 6 month anniversary! Just wanted to mention that. It is the 13 right now, but I just noticed it so yay! Let's celebrate really fast right now! Yay! Streamers! Cake! Yay! Oh no, it has peanuts in it, I can't have it! Poo! Oh well, I guess I'll just have a chocolate. Yum! Okay. Done celebrating. :D
Random + Writing,
CB

Showing posts with label random. Show all posts
Showing posts with label random. Show all posts
Friday, January 13, 2012
Sunday, January 8, 2012
Callous in Blunderland (A One-Man Show) (Family, Comedy)
A girl (CB) named Callous ventures into the mysterious world of Blunderland, meeting all sorts of new friends and foes. When she makes a very big mistake, she wonders if she will ever sort it out.
Written, produced, and directed by CB. A one-man show!
Thank you for watching!
This production brought to you by:
The Art Drawer, CB, GB
And Viewers Like YOU!
Callous...CB
Door...CB
White Rabbit...CB
Centshire Pig...CB
Mad Hotter...CB
Queen of Hearts...CB
Tinkerbell...CB
Director...CB
Poker Player...CB
The Art Drawer...Itself
The Art Drawer Voice...CB
Directed by...CB
Filmed by...CB
First waking scene filmed by...GB
Views of Poker Player filmed by...GB
Story by...CB
Written by...CB
I forgot to mention:
Costumes and Props provided by...CB
Thank you for watching! I hope you enjoyed. Please, don't hesitate to give feedback!
Random + Writing,
CB
P.S. I apologize for being so late! It was supposed to be filmed and edited many, many months ago, around the time that I wrote it, but I didn't. At least it is here now!
Saturday, January 7, 2012
Coming Soon: Callous in Blunderland *UPDATE!*
Yay! Camera charged, and I filmed every bit of it. I am currently snatching bits and pieces and building my video! It IS a one-man-show, so be prepared! It is pretty cool.
I have a rather large costume and prop collection, so I have a wide variety of things to use in the video.. I just couldn't find a visor hat... Oh well!
I am looking forward to posting it! It should be baked with golden edges by tomorrow. Look for it soon!
Random + Writing + VIDEOS! YAY!,
CB
I have a rather large costume and prop collection, so I have a wide variety of things to use in the video.. I just couldn't find a visor hat... Oh well!
I am looking forward to posting it! It should be baked with golden edges by tomorrow. Look for it soon!
Random + Writing + VIDEOS! YAY!,
CB
Friday, January 6, 2012
The Diary of Neville Longbottom
Check out this new blog: www.nevillesdiary.blogspot.com
It is a fanfic of Neville Longbottom from Harry Potter. He is really depressed! Poor Nevvy!
Written by Yours Truly
Based on and inspired by the Harry Potter novels by J.K.Rowling and movies, property of Warner Bros. Entertainment Inc.
Neville Longbottom or other characters, settings, names, and objects are completely and absolutely property of Warner Bros. Entertainment Inc., and J.K.Rowling. COPYRIGHTED NAMES ARE NOT PROPERTY OF THE ART DRAWER, OR CB. Some story lines are kind of my property, but not copyrighted. Reproduction is just discouraged. Thanks! :)
Monday, December 26, 2011
The Signs of the Holidays (Video)
The Signs of the Holidays
Time Duration: 28 seconds
Music: Piano, Guitar, Strangs, Tamborines, and Muffins (Garageband music by CB. Rights protected)
Thursday, December 15, 2011
Sixth Grade Christmas
In my class, the 6 people in our grade have decorated the pod for Christmas (the pod it the in between room between classrooms. Sometimes called the office, too). We have Christmas lights around the whiteboard, tinsel streamers around the door, bells, stockings, Christmas trees, and ornaments. But the most fun of all is the Secret Santa! We are getting gifts for each other. I got a present already. Also, since one of the kids in my class might not be here on Friday (our Opening Day), he showed his to his recipient today, but the recipient can't have it till tomorrow. Mine is already wrapped. In the morning, I need you to email me, reminding me to bring the Secret Santa gift (itsbumpybackhere@gmail.com). The funny thing is, we haven't told our teacher, and we didn't have permission to decorate, but she saw it and didn't object... I wonder how she will react on Friday when we give and receive? O.O Laul!*
Random + Writing + Christmas,
CB
P.S. Sorry if you don't celebrate Christmas! That is perfectly fine! No reason it wouldn't be! If you don't celebrate Christmas, in the comments, tell us a little bit about what you do during the holidays, or what you celebrate instead. We would love to learn about your culture! :D
*Instead of thinking L-O-L, I actually think 'laul,' as in 'Paul.' I also think 'burb' instead of 'B-R-B.' Haha!
Saturday, December 10, 2011
The Art Drawer Logo: Conclusion
The votes are in! The new logo for the Art Drawer IS.....


Da, dada DAA!! The new Art Drawer logo is the bow-tie, drawn by Yours Truly! Thank you for your submissions, which were all very beautiful! Wonderful job everyone, and thank you for participating in one of the most important events in all of Art Drawer History!
Random + Writing, for RK,
CB
Friday, December 9, 2011
How to Make a Cut-Kiwi Out of Felt
MATERIALS
- A green circle measuring 6 15/16 in.
- A brown rectangle measuring 9 2/16 x 2 3/8 in. (use the pen/marker to mark where to cut)
- brown scrap felt (for seeds)
- Scissors
- Thread
- Stuffing
- Sewing needles
- A pen or marker
HOW-TO
Inside -
- Cut many small slivers, and sew them all onto the green circle. Sew two stitches per sliver. These are the seeds.
Skin -
- With the brown rectangle, cut four rounded triangles (this means the bottom of the triangles are flat, but the sides going up to the point are rather round). Make sure that they reach all the way around the green circle.
- Sew two together, then add the next one onto one side of the two that are attached.
- Sew the fourth one onto on side of the three that are attached, leaving one side open.
- Sew the top corner of the fourth one to the rest, then the very bottom corner.
All -
- With the seams still showing, put the green circle on the bottom of the four brown triangles (the stitches behind should be showing. In other words, the green circle is backwards right now) and sew it on. It might be a bit to large to fit right on the circle. Just fold it over a TINY but in a couple places. It should do fine. Right now, it should look not very rounded, and there should be a flap hanging open.
- Flip it inside out and stuff it. Be sure not to stuff it too much, or else it just looks round and fat, and weird and really un-kiwi-ish. Really.
- Make any adjustments.
Tada!
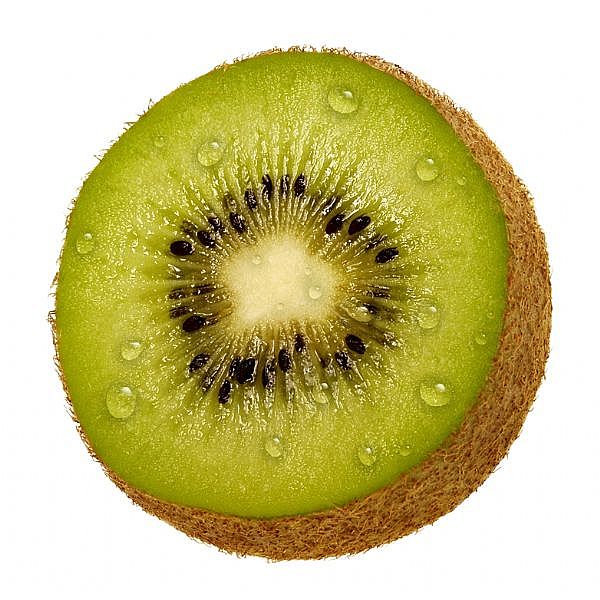 |
| Kiwi! This is sort of what it will turn out like, just a bit more puffy where it is cut. (The Art Drawer does not own this picture) |
Clarifications, comments, concerns, observations, or tips for others? Leave me a comment below!!
Random + Writing,
CB
Sew an Eggplant Out of Felt
I am allergic to eggplant, but a felt one can't hurt!
MATERIALS
MATERIALS
- Dark purple kidney bean-shaped felt
- Light green/dark green felt
- Scissors
- STUFFING STUFFING STUFFING!!
HOW-TO
- Starting at the top (the skinny part), sew one side of two of the ovals together, ending at the bottom (the fat part).
- Sew the third oval to one side of the eggplant, this time starting at the bottom. Sew up to the top (where you started sewing at the beginning.
- Sew a little bit on the side that is unattached to the other sides. Flip the entire thing inside-out, so the seams are pretty much hidden.
- Stuff a little, then sew some more. Stuff, sew, stuff, sew. Continue this until it is full of stuffing. Then close the opening.
- Cut three small green shapes, kind of looking like Justin Bieber's hair. (lol) Place them on the top part of the eggplant (the skinny part). Sew them on. If any parts need any extra securing, go ahead and sew them on. If you want, you can just sew all the edges on. Whichever you think looks best!
If you want you, you can add a stem make of rolled-up green felt and just sew it onto the middle of the green part.
Make any finishing touches, and voila! Perfecto!
Random + Writing,
CB
Random + Writing,
CB
Thursday, December 8, 2011
How to Sew a Corn Cob
Do you like or hate corn? You can't just tolerate it. You either love or hate it. So how do you feel?
Hate Love (circle one)
Well, whichever you would have circled, I guarantee you that you will LOVE this corn cob!!
MATERIALS
HOW-TO
Cob -
Hate Love (circle one)
Well, whichever you would have circled, I guarantee you that you will LOVE this corn cob!!
MATERIALS
- Three yellow pointy ovals (3 in x 2 1/2 in)
- Two green pointy ovals (5 in x 2 1/2 in)
- Thread
- Sewing Needles
- A dark Sharpie™marker or other permanent marker
- Scissors
- Stuffing
HOW-TO
Cob -
- Pin together and sew TWO of the ovals together on ONLY ONE side, but DON'T TIE OFF WHEN YOU GET TO THE BOTTOM!!!!!!!!!
- Pin the third oval to either ONE of the already used ovals. Sew the thread across the tip and sew the new oval to one side of either one of the already used ovals. Tie a knot, and if you have a bit left, you can continue as far as you can up the side. You probably will have to make a new threaded needle, though.
- When you sew a bit, put in some stuffing. Continue sewing and add a little as you sew each inch more. Finally, you will get to the very top!
Now you have finished the cob. Time to start the husk!
Husk -
- Sew about 3 in. of the ovals together.
- Once you have done this, be sure that the ovals are together, not flipped around so that to side you have sewn is flipped around. Sew the seam of the husk to a seam on the corn cob, lining it up so that the bottom of the husk reaches the bottom of the cob.
- Now it should look like the corn has a dorsal fin like a fish. Flip the husk technically 'inside-out.' Now the husk should be slightly wrapping around the corn, not coming straight off the back.
- Rethread your needle if you don't have a lot left. Stretch (not STRETCH stretch) the husk around to the front-ish side of the cob. Sew the husk to the cob. Sew exactly 2 in. from the bottom on both sides.
- Look at your cob. If the husk looks strange up above the cob, then cut it down to 4 in. and snip off some of the curve on the 'inside' of the husk until you are happy with it.
Cob Retouches (OPTIONAL) -
- With the marker, draw a grid on the cob to look like the kernels.
DONE!!
 |
| Corn cob! This is pretty much what you will be making! THIS PICTURE NOT PROPERTY OF THE ART DRAWER!! WE TAKE NO CLAIM ON THIS PHOTO, AND TAKE NO CREDIT WHATSOEVER. |
French Braid Your Hair
Well,as you probably know, it is pretty hard to do on yourself, but not impossible, because I just did it while my hair was wet. I tried to a couple days ago, and my hair was dry, and it was IMPOSSIBLE. But, since my hair was wet, the strands didn't get tangled with the loose hair.
Here is how you do it.
**NOTE: If you are a lefty, you will do this the opposite of the directions (left or right). Because I am a righty, I will do this the right-handed way.
MATERIALS
Here is how you do it.
**NOTE: If you are a lefty, you will do this the opposite of the directions (left or right). Because I am a righty, I will do this the right-handed way.
MATERIALS
- Long, wet hair
- A hair band (either size depending on how much hair you are dealing with.
INSTRUCTIONS
- Brush your hair so that you are sure there are no tangles.
- (Sort of) OPTIONAL: If dealing with short bangs, just brush straight back. If this is not the way you wish to appear, just separate the bangs, an brush straight back BEHIND them.
- Run your thumbs along the upper corners of your head, gathering hair all the way until your thumbs meet. Brush away any hair that got collected from UNDER your thumbs. This is considered loose hair.
- Separate the hair you are holding into three even strands.
- Braid, but stop before it stars to become its own braid and come off the head.
- Take a strand of hair from about two inches under the first place you got hair from. (Gather all the hair within two inches)
- Bring the hair you are holding and put it in the same strand as the strand you are about to cross over to the middle, as you would in a regular braid.
- Now do the same thing as steps 6 and 7, except from the left side.
- Continue this until you have gathered almost all of the hair. If there is hair hanging in the exact middle of the nape of the neck, you don't have to divide it in two. Just gather all of that and add it to the other strand.
- If you would like, continue braiding (a regular braid) all the way down until you run out of hair. If you don't want to do that, just tie it off with your hair band wherever you want!
Knowing how to French Braid is an important skill in creative hairstyling. You should practice on yourself and your friends and family! Because, as you already know, perfect practice makes best!
If you need any clarifications, I DON'T CARE! GO HANDLE IT YOURSELF!! Haha! Just kidding! If you need any clarifications, just drop me a comment below. Don't email me, because others might have the same question, and I bet they would like to get the answer at the same time. :)
Good luck!
Random + Writing + HAIR,
CB
Monday, November 7, 2011
The Art Drawer Logo! *UPDATE!* Entry #5, 6, 7 and 8
Each of these are from moonembrace. Beautiful! Thank you, moonembrace!
5
 6
6


5
7
8
Thank you, moonembrace!! Very creative.
Random + Writing,
CB
Saturday, November 5, 2011
Sewing Your Own Drawstring Bag
You have probably seen those little fabric bags that have a piece of yarn or string going through the top, so that you can pull the string and the opening gets all bunched up and closed. These are called drawstring bags. If you have seen them for sale, chances are, they were pretty expensive, or they were holding something expensive. Well, now, you can make your own in 8 easy steps!
Materials:
Time Duration: About one (1) hour
No. of Steps: 8
How To Make It:
 |
| These are the 4 bags I have made using this technique. The green floral one was made differently, but similar to the ones you will be making. It is different in that the drawstrings come through a different way. They come through the sides and not the middle, but it works the same and is as easy to make as the others. |
Materials:
- Two fabric squares of any size
- Thread
- Sewing needle
- String or yarn (enough to go all the way around the top of your squares twice)
Time Duration: About one (1) hour
No. of Steps: 8
How To Make It:
- Make sure that your two fabric squares are about the same size. Don't worry about small differences, because none of the edges will show.
- Turn the squares inside out (so the front of each square are facing each other). Thread your needle with enough but not too much thread. Decide which end of the squares you want to be the top (left open) and put the first knot on the corner of that end.
- Sew away from the top (in the direction that leaves the top open) and go as far as you can with that thread. If you need to thread the needle again, that is okay and to be expected. Make sure you finish sewing in the very top corner opposite your first knot. Tie it off.
- Cut a length of yarn or string that s long enough to go around the top of your fabric square twice with some left over. Flip down the rim of the bag so that the front of the fabric shows (a little less than an inch). Slip the yarn into the crevice that appears. If you don't have enough thread to go all the way around the bag with a bit left over, tie it off and rethread. Begin at the side you finished at, and sew through only one square at a time. Use the over-under stitch and go to about the middle of the next square.
- When you get there, cut a very small hole (for the yarn/string to go through) in the layer that is NOT flipped down (this hole goes to the side that is facing the front of the fabric).
- Put one OR both ends of string through the hole. If you only put one, cut another hole near the first (but not touching) and string the yarn/string through.
- Now, turn your bag inside out. Pull on the strings and close and open the bag until they are about the same length. Cut the strings to about 1 inch more than your desired length. Tie a triple/double-knot near the end of each string. If you have enough string, you can tie a knot through both strings at the hole/s (MAKE SURE THE BAG IS FULLY OPEN).
- Make any other minor adjustments to your bag until it is exactly how you want it.
Now you have your own drawstring bag!!
Tuesday, November 1, 2011
Doctor Who Contest Results *CONTEST NOW CLOSED*
Thank you to all who participated in the Doctor Who Creativity Contest! Everyone here behind the scenes of the Art Drawer really appreciated how creative your entries were. Every single one of us, technicians, writers, comedy writers, actors and more all enjoyed seeing the wonderful drawings and buildings. I am sure Doctor Who would, too.
The Results:
First up, we have KingofRandom with his really cool manga drawing!
(Text: Text Box:
"Today's Lecture: Time
Guest Speeker: The Doctor"
Chart: Time [arrow] Wibbly wobbly timey wimey"
"Zander Krasny")
We really liked the idea! Never would have thought of it! Thanks, KingofRandom!

Second, we have moonembrace! She has sent us two pictures of her creations. She made CRAYON TARDISES!!!!!!!! I was quite impressed with her creativity. She tells us the photo quality was bad, so she tells us these are crayon Tardises. Thanks!!


Those were our winners (Both tied for first place). Sorry for the wait, but creativity never ceases! If you are inspired by these winners and want to enter your own idea, feel free! The contest is still open, but our winners have already been chosen. Thanks!!
Random + Nurby,
CB and RK
4 Month Anniversary
Yay! We have kept the Art Drawer going for 4 months so far. I hope we have a lot of great readers, nay, I know we do. You guys have stayed with us through thick and thin, through bad writing days and good writing days. And weird days. A heck of a lot of weird days. But that is beside the point. The point is, thanks. The point is, the Art Drawer is not only here for our enjoyment, but yours, too. And we hope you have enjoyed the Art Drawer so far, because there is a lot of it left! Because November is the 4th month of the Art Drawer, AND National Novel Writing Month, why don't you write some fan fiction of CB and RK's daily lives? You can leave them in the comments. You know, what you think we are like based on our posts. Thanks! Hahaha!
Random + Writing,
CB
Random + Writing,
CB
www.NaNoWriMo.org
Do any of you like to write? Well, November is the national novel writing month! Or NaNoWriMo for short. This is a national activity that encourages the art of literature.
Every year, published and celebrated authors and even regular people are challenged to write 50,000 words or more by the end of November. It is a fictional book that was completely started and finished within the month of November.
You can't have written any part of it or even outlined it. You can have an idea starting in your head, but try not to think too much about the plot, since many people outline books in their heads.
If you want to sign up, it is free and it is a very trusted website. www.nanowrimo.org is the URL. Remember, when you are making your quick and easy account, click the button that says you are 13 and up, because this means the website is not violating the law that no personal information may be solicited from children 12 years and younger over the internet. It means you knowingly give your permission to have an account created.
I entered a few days ago, and I have been waiting for three painstaking days to start writing, and today is November 1 so I began writing. I have 494 words of 50,000 so far. I might just make it. The goal is 1,667 words a day. In 30 days. Do you think I can do it? Do you think YOU can do it? Even if you aren't going to participate, do you think you WOULD be able to do it? Leave your answers in the comments!
Good luck and get writing!
Every fictional novel has a main question, a question that decides the plot. What is yours?
Random + Writing + 50,000 words,
CB
Monday, October 31, 2011
Happy Halloween!
A night, so scary and frightful, a night so sweet and fun!
No, this is not a poem, though, yes, I know, it sounds like one.
Hallow's Eve is upon us! The Headless Horseman reaps your fear,
And the Jack-O-Lantern stands outside your door.
Ghosts, mummies, Witches, zombies, pumpkins, animals galore!
What are YOU dressing up as? Any of these, or more?
Okay, I guess it was a poem. I hope you enjoyed my accidental awesomeness. Sorry I am being so theatrical right now. I am in my WRITING MOOD! NaNoWriMo starts tomorrow, but that is another post for another time.
Happy Halloween!
Boo!,
CB
Saturday, October 29, 2011
CONTEST: The Art Drawer Logo! *UPDATE!*
NO ENTRIE5. I have drawn two, and hopefully RK has drawn one. We haven't gotten ANY from YOU!! Please, no matter how terrible, no matter how horrific it may be, please, just send it to us. It doesn't have to be scanned into the computer, just a simple photo of your drawing will do! PLEASE!!!!!!!!!!!!
Thanks.
Random + Writing,
CB
P.S. Furryicecreamcone? I am sure YOU have an idea!!! ;)P Haha! ;)P
Thanks.
Random + Writing,
CB
P.S. Furryicecreamcone? I am sure YOU have an idea!!! ;)P Haha! ;)P
Tuesday, October 4, 2011
Doctor Who Contest
Who watches Doctor Who on BBC or BBC America? It is a show about an alien called a Timelord who is the last Timelord left. He calls himself the Doctor. He is in love with the Human race and does his best to save us from aliens and possible threats, like machine aliens called Daleks, stone angels that move, and many more! He travels around the universe in a big blue time machine police box that is bigger on the inside, and it is called a TARDIS (Time And Relative Dimensions In Space). Also, it has been going since the 50's. The Doctor regenerates when he is dying, and that means the studio can switch actors. If you DO watch Doctor Who, you should participate in this contest!
moonembrace is on of our followers. She is also one of my close friends. She LOVES Doctor Who, so I thought she would enjoy this contest.
Please send in a picture of something creative you made from the show! I just made a paper TARDIS, and I saw online some pictures of people dressing up as their favorite Doctors from certain seasons. Whatever you want to do, just be creative and please read the Safety Online Rules and Regulations at the bottom of this post.
Since this is a CB contest, please email to itsbumpybackhere@gmail.com to enter. Please include a nickname for us to call you, because all pictures and FIRST/NICKNAMES will be posted! None of your personal info will be shared with anyone, also because you WON'T BE GIVING US ANY, right?
Good luck! This contest ends when we have at least 5 entries. The winner will be chosen soon after, but everyone will be mentioned! :D
Safety Online Rules and Regulations
- Do NOT include personal information in your email or photo. If any personal information is found, it will be edited out. If personal information is included in your photo, you will be disqualified and you entry will no longer count.
- Do NOT be gross. This a nice contest, and there is no reason to be inappropriate. Why would you?
- Do NOT ever give us personal information in a casual email (not in a contest). Never give us your phone number, address, last name, or user names and passwords, whether for us to post or not. An alias for you will be created and we will post that you have given us personal information. Your info will not be posted, but the fact that you have emailed that to us will be.
- If you are ever rude to another reader, you will be reported. Oh yeah. We went there!
Thank you for reading our Safety Online Rules and Regulations! If, and only if, any of these rules are broken, you will be reported. Thank you!
Good luck, and BEGIN!
Wibbly wobbly timey whimey stuff! OooOOh!!!
Random + Writing,
CB
Ball Lightning ("Thunderstorm" response)
IN RESPONSE TO "Thunderstorm": The same night on our walk before I could film it, I saw a little orb of light buzzing around the small thunderhead. Dad told me it sounds like ball lighting, which it still pretty controversial on whether it exits or not. I think it does since I saw it, but I don't know for sure... :)
How many of you think you saw ball lighting? It might be a gold orb of light buzzing around a cloud, or something like one of these at this link (google images):
The ball-lightning.jpeg at b3ta.com pic is pretty close. It is the one on a dark blue background with a white streak of lighting and a trail of golden orbs coming off of it.
When my grandma was young, their house was struck by lightning, and the stove exploded. A ball of light rolled across the floor and disappeared. Was this ball lightning, or just a shared hallucination?
Random + Writing,
CB
Subscribe to:
Posts (Atom)